All we need is love

All we need is love
All we need is love

Tuesday, October 23, 2012

A joke a day.....

.  .  .well, it doesn't necessarily keep the doctor away, but it does help to make my kids' lunches fun and exciting!

Do you send notes in your kids lunches?? I do. But lately as they have gotton older, I feel like I need to do it in more conspicuous ways to avoid their embarrassment in front of their peers. After all, I do have a couple of pre-teens on my hands.

Well, one way I have found to send a little Mommy-love and happiness in their lunches is to attach a joke or riddle to one of their foods. During the holidays, I like to write it on papers that fit the spirit of the holiday, like this Halloween bat on their PB&J "Uncrustable". The other side holds the answer to the riddle. I know they love these, because they often talk about them on the way home, or I hear them posing the riddle to their friends after school. Sometimes they even save them! (That makes my heart smile!) 

This may seem like a lot of work in the morning. . . finding colored paper, cutting out fun shapes and coming up with a riddle- I know. So what I like to do is sit down after the kids are asleep while I'm watching something on TV and make a bunch of them ahead of time. I keep them on top of the fridge where they won't see them and then I attach one every few days to their lunch foods. Oh, and I make 2 of each one (one for each kid).


By the way- do you know the answer to the riddle??? Post your answer in the comments below if you think you do!


Monday, October 22, 2012

FALL FEST!!!


So we had our annual Fall Fest! I was so much fun! It wasn't as big of a turn out as usual, but those who did show gave their best!  Here are some of my favorites from the party!


Thanks for coming everyone! Until next year!!


Sunday, October 21, 2012

Candy Corn Krispy Treats

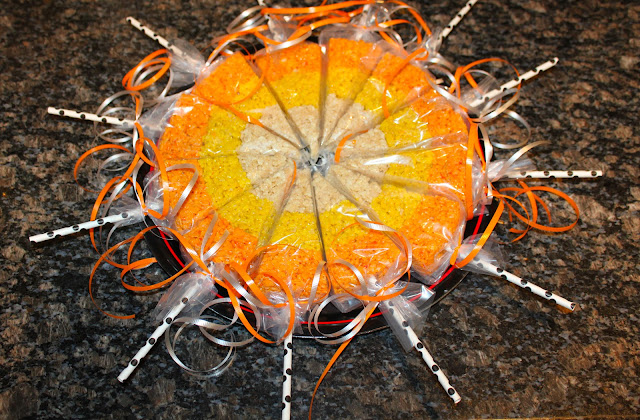
Give me some marshmallows, Rice Krispies cereal, butter and some food coloring and I can make you a treat fit for any occasion that is sure to make you smile! This year I made some Rice Crispie Treats on a stick to look like candy corns for Fall Fest. 
Fun, festive, portable goodies! Love it!

I'm sure you could figure out a way to make these, but for those of you who like tutorials, here you go! Always happy to share with you how my brain works! :o)


You need enough ingredients to make 2 batches of Crispie treats. This should yeild 24 treats in the end. If you don't have your cereal box in front of you, here is a reminder of what you need to make them.

Ingredients
1/2 cup (1 stick) of butter, divided in half
12 cups of marshmallows, divided in half
18 cups of Rice Crispies, divided in half

Other materials
orange and yellow gel food coloring
paper straws or paper dowels
4", 7" and 10" cake pans
Pam (cooking spray) 

Directions

Melt 1/4 cup of butter in a large pot on medium low heat, add half of the marshmallows and stir constantly until smooth and creamy. Mix in few drops of orange food coloring. Remove from the heat and add your cereal, stirring to coat. 

(1) Immediately pour half of the Rice Krispie mixture into a greased 10" pan. With greased hands, quickly pack it to the sides of the pan until you can fit the 7" pan in the center. Pack it down and flatten in out.


(2) Remove the 7" pan an invert the Krispie circle onto a large flat surface to cool. In the mean time, repeat step #1 with the remainder of the cereal mixture, but this time, leave it in the 10" pan.

Make a second batch of Krispie Treats, except this time, reserve 1/3 of the cereal in a bowl and the other 2/3 in another. Once your marshmallow mixture is ready, add 1/3 of it to the 1/3 of cereal and tint the other 2/3 with yellow gel color. Mix the yellow marshmallow into the 2/3 cup of cereal.

(3) Pack half of your yellow Krispie mixture into the 10" pan that contains one of the orange Krispie rings. With greased hands, quickly pack it to the sides of the pan until you can fit the 4" pan in the center. Pack it down and flatten in out.

(4) Remove the 4" pan and invert it onto a flat surface. Then take the first orange ring and place it back into the pan and repeat step #3. Leave it in the pan.


(5) Pack half of the uncolored Krispie Treat mixture into the center of the circles you've created. 

(6) Invert the completed concentric circles onto a flat surface to cool. Place the other rings back in the pan, and repeat with the remainder of the mixture.

(7) Once it has cooled for about 15 minutes, score the top of the completed circle with a sharp knife where you plan on cutting it. I divided each one into 12 equal parts. Then I shoved a pretty paper straw into the center of each piece carefully as not to upset the perfect circles you've created.

Let this set up for another 15-30 minutes and then cut through the circle on the score marks. Doing it this way helps to maintain the perfect divisions that you made. Plus, if you were to shove the straws into each triangle after it was cut, you take the chance of ruining the original shape from manipulating it.

(8) Wrap up each treat in plastic wrap or triangular shaped plastic bags sold at your local cake decorating store. Tie them with some curling ribbon and store at room temperature. 

Saturday, October 20, 2012

Popcorn Balls

Tonight is Fall Fest and I am busy preparing some yummy treats for the kids to enjoy during the party. One such treat are these cute little popcorn balls. I have the yummiest recipe that I'd love to share with you! It's a ton easier than most I've tried and has the perfect balance of chewy and crunchy textures.

Popcorn Balls

Ingredients
3 bags of popcorn popped (or 5 quarts)
3/4 cup light corn syrup
1/4 cup (1/2 stick) butter or margarine  
2 teaspoons water
2 5/8 cups powdered sugar
1 cup marshmallows
**add candy corn and festive sprinkles for a festive touch

Directions (this is the "super easy" part I told you about)

(1) Pop your popcorn and place it in a huge bowl sprayed with cooking spray
(2) Place all of the ingredients (except for the popcorn) in a large saucepan and stir to combine. Once it comes to a boil, pour it over your popcorn and mix it until all of your popcorn is coated.

(3) Spray your hands with cooking spray to prevent sticking and begin to form the popcorn mixture into balls. 
(4) Once you have formed all of your popcorn into balls, let them sit out for 5 minutes and wrap them up. Store them at room temperature. 


 **My original idea was to tie a little note to each one that said, "How sweet of you to come! Thanks for popping by!" and give them to people as they left. Well, I didn't have time for that, unfortunately, so a little festive ribbon will have to do! I know they'll love them.

Friday, October 19, 2012

Homemade "Uncrustables"

Homemade "Uncrustables" with a Halloween twist!

One of the kid-friendly foods I like to make for parties is what I like to call "Gourmet PB&Js". I make 3  different peanut butter and jelly sandwiches with a variety of preserves and usually one with Nutella or chocolate ganache instead of jam. The kids go crazy for them and so do many of the adults! They are perfect for the picky party-goer. Who doesn't like PB&J?? 
Well, these ones were made with a scalloped sandwich press from Williams Sonoma and topped off with a Wilton cookie stamp to give it that festive detail. These will be just right for our Fall Festivities tomorrow! I can't wait!

Wednesday, October 17, 2012

Sew What???

Aria wanted to spend some time during Fall Break sewing a little purse for herself. She found a pattern at Jo-Ann's and picked out fabric to suit her taste. 

She spent an entire day on this project. I was amazed and impressed at her dedication and desire to make a quality piece!

Aria was also very dedicated to the task of learning how to use the sewing machine correctly. She is a great student. 

Although it was her least favorite part of the project, she sat patiently and hand sewed parts of the purse together. Here she is sewing the lining in.

Pretty girl!

My proud girl with her new purse. She did an excellent job! It has a black pocket on the outside to match the lining, and there are a couple of pockets on the inside that match the colored fabric of the outside of the purse. Sew clever!

The lined inside of the purse. Very well made. 


Not only was I able to teach my daughter a skill that I learned as a teen and honed throughout my life, but I gained a whole day of one-on-one time with her. This is a memory I will never forget.

Tuesday, October 16, 2012

Circle Paper Garland

Today I said, "Good-Bye" to the beautiful rainbow paper garland that's been hanging in my house since Aria's birthday. Yes- it was intended to be a party decoration, but I loved them so much that I decided to keep them around until something else replaced them. 

For our annual Fall Fest, I've made another pretty paper garland. Just like the rainbow garland, these lovely circles spin as you walk by. Some are hanging straight down like below and others are draped in doorways. I really like how they turned out. 


Wanna see how I did it??

Heres what I used:

(1) Cardstock or other scrapbook paper cut into various sized circles. I recommend some type of paper cutter for this. 

(2) I used Fiskars circle punches in 4 different sizes.

(3) A mini hole punch. This little baby is by Martha Stewart and I believe it cuts holes about 1/16th of an inch in curcumference.


(4) Oval Jump rings. (Find them in the jewelry making section of any craft store.)

(5) Needle nose pliers. (A teeny-tiny pair.)

(6) PATIENCE + time
(If you don't got it- this project may not be for you.)


Once you have punched out your circles, use your mini hole puncher to make little holes at two points of the circle, one at the top and one at the bottom. You should be able to punch holes in 6-8 circles at once. 


 Then, use your pliers to open a jump ring. Loop a circle onto it, followed by another, then close the jump ring again. 

Continue adding circles until the desired look is achieved. 

 Hang them with string looped through the end-circle's mini-hole.