All we need is love

All we need is love
All we need is love

Thursday, September 27, 2012

Pumpkin Pull-apart Cinnabread

I am so excited to share this recipe with you! It is soooo incredibly delicious - my husband said it's his new favorite food! LOL! This was the first of my Fall pumpkin recipes to try this year and it is definately going down into my personal book of favs.

Let me warn you though- it's not a quick or easy recipe. If you follow the directions, you will be able to make it, but if you've never made a yeasted dough before, it might be a little challenging for you. If you decide to attempt this one, you won't regret it- down to the last soft, sweet, sticky, gooey bite!

Pumpkin Pull-apart Cinnabread with a buttered rum drizzle

First- melt 2 tablespoons of butter in the microwave along with 1/2 cup of milk. Place a food grade thermometer in the bowl of warm liquids and wait until it cools to about 110 degrees. Once it's there, add a packet of yeast (or 2 1/4 teaspoons) and 1/4 cup of sugar, stir it well with a metal fork and let it sit for 5-8 minutes until it proofs. The word "proof" refers to the process of making sure your active dry yeast is still alive and will act as a good leavening agent. If it is, you will see your mixture grow to create a creamy foam on the surface of the liquid.
Next- add 1 cup flour, 3/4 cup canned pumpkin,  1/4 cup sugar, 1 teaspoon salt, and mix to combine. Add the rest of the flour (1 1/2 cups), 1/2 cup at a time until the dough comes together. Knead the dough for 8 minutes until smooth and elastic. Place the dough in an oiled bowl and cover with a damp cloth. Place this in a warm place for about an hour- by that time it should double in size.

Once it has risen, punch it down and knead it again for about 2 minutes, using a few tablespoons of flour and then let it rest, covered with a towel for about 5 minutes. 

At this time, make your filling. Combine 1 cup of sugar, 2 teaspoons of cinnamon and 1/2 teaspoon of nutmeg and set aside. Melt 2 tablespoons of butter and set this aside also.

Now you can go back to your dough and roll it out into a large rectangle- about 12x20 inches. Brush the entire surface of the dough with the butter and then cover it evenly with the spiced cinnamon sugar mixture. 

Now, cut your dough rectangle into 6 even strips. Luckily, perfection is not necessary here. 

Then, stack all 6 dough strips on top of each other and then cut this into 6 even-ish pieces.

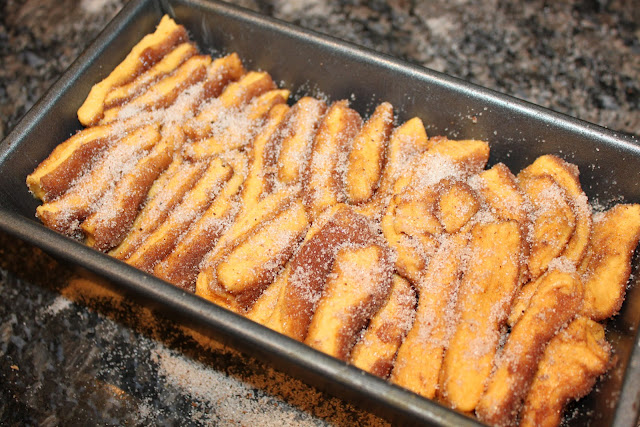
Pack these dough pieces into a greased bread loaf pan (I suggest brushing the pan with Cake Release to ensure it comes out perfectly). I alternated the pieces like this. Cover it again with the damp towel and let it rise for another 45 minutes in a warm place.

Once it has risen, place it in a preheated oven (350 degrees for a metal pan, 325 for a glass pan) and bake for 30-35 minutes. Mine continued to grow beyond the top of the pan as it baked, and some of that lovely, sweet goodness dripped out onto the bottom of my oven making a burned mess. So, I recommend that you place a piece of foil on the bottom of your oven to prevent this from happening to you. Once it is golden brown on top, remove from the oven and let it cool for 30-40 minutes before removing from the pan. I turned out the whole loaf onto my hand and placed it on a place for serving. 

While it's cooling, make your buttered rum topping. Heat 2 tablespoons of butter, 1/8 cup of brown sugar and 2 tablespoons of milk in a small saucepan until combined. Add to this 1 tablespoon of rum or rum extract (I used real rum) and stir this into 1/2 cup of powdered sugar until smooth and creamy. Add  more milk if it's too thick (only a splash at a time) and then drizzle it over your bread once you have removed it from the pan.
To serve, pull a few pieces from the loaf and enjoy. It is best when served warm.


Pumpkin Pull-Apart Bread Ingredients:
1/2 cup milk
3/4 cup pumpkin puree
1/4 cup white sugar
2 tablespoons unsalted butter
1 teaspoon salt
2 1/4 teaspoons (1 envelope) active dry yeast
2 1/2 cups bread flour

Filling Ingredients:
1 cup granulated sugar
2 teaspoons ground cinnamon
1/2 teaspoon fresh ground nutmeg
2 tablespoons unsalted butter

Butter Rum Glaze Ingredients:
2 tablespoons unsalted butter
1/8 cup brown sugar
1 tablespoon plus 1 1/2 teaspoons milk
1/2 cup powdered sugar
1/4 teaspoon rum (the original recipe called for extract, which I found too strong)

Wednesday, September 26, 2012

The results are in

Remember my recent post Oh say can you see? where I announced that I auditioned to sing the anthem for the Suns games?? Well, I got an e-mail today saying I wasn't chosen. I am a bit sad. I'd like to think I still have it, but I guess not. Out of over 300 auditioners, only 33 were chosen. Next year?? Well see. I'll have to practice! Luck favors the prepared, you know!

Sunday, September 23, 2012

Happy Birthday Marissa!

Yesterday Greg and I got all prettied up with a bunch of our friends to celebrate my sweet friend Marissa's big 30th Birthday. 
I made her a little cake as my gift to her. Simple. Elegant. Perfect


She loved it!

 We had a great night celebrating a great girl! 
Happy Birthday Marissa! Love you!


Easy, Savory Chicken Bake

I met up with one of my closest friends a week ago for dinner and a Ballet. The Arizona Ballet Company was having their annual Ballet Under the Stars in Fountain Hills and so Aria and I were able to share in this beautiful event with our friends. Before the performance, our friends had made us dinner- this delicious chicken dish with veggies and potatoes. Aria and I just loved the flavors so much that I had to ask for the recipe. I was amazed and impressed with the simplicity of the dish. It is simply too yummy and easy for it not to be in the dinner planning queue for every busy mom. I've made it twice since!

I don't have a picture of the final result- but here's what it looked like before I dressed it and put it in the oven. It's just a raw veggie or two, a few chicken breasts, and some baby new potatoes, cut into bite sized pieces (quartered). 

Then all you do is melt a stick of butter and add to it 1) a packet of Good Seasons Zesty Italian Salad Dressing & Recipe Mix and 2) a heaping tablespoon of McCormick Grill Mates Montreal Chicken seasoning (this comes in packet form too), and pour this over your chicken, veggies and potatoes. Cover with tin foil and bake it in the oven at 350 degrees for an hour and your done! 

It's really that simple. You'll be presenting your family with a delicious meal that they will ask for again and again! Let me know if you try it!

Saturday, September 22, 2012

Hello Baby Gecko!


Hello Baby Gecko! I just wanted to say thank you for letting me snap a picture of you! It was quite brave of you to stay still long enough for me to do so! Your pink bumpy skin is very lovely and your eyes are stunning! My children and I are quite fascinated with all 2 inches of you! We appreciate you helping to keep the bug population down in the house. The next time you see one of us, please don't be afraid- we won't hurt you- we just like to see how you've grown. But if you see a slobbery, hairy thing sniffing toward you, please run- run fast! 

Friday, September 21, 2012

When life gives you lemons..... AND basil.....

Well. . . you make basil-infused lemonade of course! Right??

 I massacred my basil bushes the other morning because it was looking rather overgrown, and had a ton of it in a bowl for me to figure out what to do with it. My daddy would say, at the least, dry it out and use it for sauce! But, I thought I'd play around with it first. (More of that "Chopped" mentality working in me.)
I saw some lemons in my kitchen waiting to be squeezed and decided to make some homemade lemonade infused with fresh basil.
I had no idea if it would taste good or not, but the idea was worth a try, so I fiddled in the kitchen for a bit and you can see the result above. Let me tell you- it was refreshingly delicious and not at all weird! In fact, it was hard to put it down! 

The very next day I realized ANOTHER thing you can make when life gives you lemons AND basil. . .
Basil-infused Arnold Palmers!

Yep! But this was wasn't good- it was better than good- SO good- that I have had one every afternoon since! (Just in case you don't already know- an Arnold Palmer is a very popular drink named after a famous golfer, that is made by mixing lemonade with iced tea. It's yummy! Aside from juicing the lemons, it's very easy to make. Let me tell you what I did. 

Basil-Infused Lemonade

Ingredients
(for the basil-infused simple syrup)
2 cups granulated sugar
1 cup water
2 cup chopped, fresh basil leaves, cleaned

lemons

To make this drink, you must first make the simple syrup. A simple syrup is just a mixture of sugar and water dissolved over heat and then cooled. It can be infused with any herbs or fruits and then strained, refrigerated and saved for later use. For this recipe, simply place the sugar, water and basil in a small pot, heat on medium and stir until dissolved. Strain it into a mason jar and store in the refrigerator until ready to make your lemonade. 

Then, squeeze enough lemons to equal about 1/3 of the amount of lemonade you will want. Then add this to a pitcher and combine it with equal parts water and the simple syrup. Stir and taste. You may add more water, or syrup if desired to fit your taste. I like mine tart, so using exact equal parts will create a tart drink for you. Pour this over ice and garnish with a basil leaf and lemon slice. 

To make a basil-infused Arnold Palmer, simply mix equal parts un-sweetened iced tea to your basil-infused lemonade and enjoy! I hope you give it a try and enjoy it as much as I do!


Thursday, September 20, 2012

Liz and Dominik

Yesterday was such a great day! I finally got to meet my dear friend Liz's gorgeous baby boy, Dominik. Not to mention this was the first time I was able to see her since her baby shower! We had a really nice visit- talking, laughing, reminiscing. I'm so sad that she has to go back home to Cali but so thankful that we  were able to have some quality time together. 

And check out this gorgeous hunk of baby boy! Isn't he the cutest!?! I'm sure that the next time you see me post on him, it will be bragging on a baby modeling job! 


LOVE this boy!


Love you Liz- can't wait 'till we can do this again! ox

Wednesday, September 19, 2012

Oh say can you see?

I auditioned to sing the National Anthem today for the Phoenix Suns. I used to sing for those games over 10 years ago and thought I'd give it another go. I did okay. . . not my best, but at least there were no blunders! I'll find out in 2 weeks whether or not I was chosen! 
Keep your fingers crossed!

Tuesday, September 18, 2012

Snapfish- you've done it again


I got a couple more canvas pics of my BEAUTIFUL kiddos in the mail from Snapfish. They are simply perfect- better than I expected! They are 8x8's and I can't decide where to put them. Until I decide, I will just stare at them with a big chagrin on my face. Any suggestions???

Monday, September 17, 2012

I can't help myself....


 I know it's not quite Fall yet, but I'm a sucker for the season. So when I went to the grocery store and saw pumpkins for sale, I just had to buy at least one! Then of course, I had to get a bunch of sun flowers to compliment my pumpkin and set out my Great Owl lantern to complete the decor. Doesn't it just make you smile?? That's exactly what it does for me! Pretty soon the weather will get cooler and we'll get to wear boots and light sweaters and jeans while we're cooking soups and breads and desserts with pumpkin and nutmeg! Ahhhhhh. I heart Fall!

Sunday, September 16, 2012

Gourmet Peanut Butter Sandwiches

Greg and I are huge fans of this show on the Food Network called Chopped where 4 chefs are given the same basket of mystery ingredients to make a meal course with- first an appetizer, then an entree and of course a dessert round to cap it off. The chefs on that show are so creative in how they can turn the oddest of ingredients into a delicious, cohesive meal. Watching it inspires me to be adventurous in the kitchen and try new things- recipe free.
Now, I'm not daring enough to add Peeps marshmallow candies to my lamb steaks but I have, on occasion, tried a few things I might not have tried before. Today was one of those days.
I was inspired after a trip to my local Trader Joe's. I never go there, but was encouraged to by someone who recommended their organic and inexpensive peanut butter. During my trip there, I smelled something amazingly fragrant cooking that was made with coconut oil- an ingredient I have never used before. So, I thought I'd bring it home and try it out in a few recipes.
Well, with the new ingredients before me, I set out to cook a decadent peanut butter, banana and honey sandwich for my family's lunch. I used a whole grain, wheat bread that I lightly brushed with the coconut oil on one side and smothered it with this crunchy Valencia peanut butter with roasted flaxseeds on the other before I placed it in a hot pan to sear. Now, I don't typically make my PB&J's in a pan like a grilled cheese sandwich, but like I said, I was feeling adventurous. In addition to the peanut butter, I layered the sandwich with some slices of banana and a heavy drizzle of honey.
The result- Ahhhh-mazing!
We all loved it- down to the last bite! The perfect pairing with a icy cold glass of milk. It was hot and melty, with a little crunch from the peanuts, and the coconut oil added the perfect compliment and fragrance to the sandwich. I highly recommend you give it a try!


Saturday, September 15, 2012

Race for Cystic Fibrosis

This morning, some of my coworkers and I laced up our running shoes and ran a race to benefit the local Cystic Fibrosis (CF) Foundation. Each of us work on the Pulmonary/Med-Surg unit at our hospital, so CF is something we deal with on a regular basis. Our hearts have all  been touched, in some way, by the amazing people we care for who live with, and sometimes die by, this chronic disease. We wanted to show our love and support. 
So we ran!

It was a small race. There were probably only 100 runners at most. The turn out wasn't half bad, though, considering the coordinators threw it together in a short span of time. This year was their first 5K of hopefully many to come to support research for Cystic Fibrosis.


Looking forward to doing it again next year!


Thursday, September 13, 2012

Sock Bun Tutorial

Do you remember the tutorial I posted at the end of May on how to create the perfect bun?? Well, I have recently learned another technique for this same look and it is much simpler to create. It requires nothing more than a rubber band and a sock! Yup- that's right. . . a SOCK! It's so very cool and easy (once you have done it a couple times) and is a great up do to add to your repertoire. 
So here's what you do.

Before you even touch the hair, you need to make the sock roll. You can accomplish this using any old tube sock. Just cut the straight part off from the rest of the sock and discard the toe portion. (If you use a sock that matches your hair color, it will be much less noticeable if your bun is slightly less-than-perfect and part of the sock is showing.)

Take that straight length of sock and roll it into itself, creating a sort of sock doughnut.

Now, put the hair in a high ponytail. 

Take that sock doughnut you just made and pull the hair through the center.

Now, slide the sock doughnut down the length of the ponytail until a few inches remain and grip it tightly to prevent the hair from slipping out. Do this in an upward motion so it's easier to work with. You should have something that looks like a little hair palm tree sprouting from your fist.

Then, fold the hair evenly around the circumference of the sock, tucking it under your fingers as you go until it looks like this. While keeping your grip on the hair around the sock doughnut, give this bun a twist for some added security.

Carefully and quickly grab hold of the hair-covered sock and begin rolling it under, as though you were turning a pair of socks inside out. Continue to do this until the rolled hair is close to the head. It should look like this finished bun.
Simple City!


At this point you can pin it in place if you want some added security. For longer hair, however, pins are not needed and it should stay on it's own.

Beautiful!


Wednesday, September 12, 2012

Whole Wheat Oatmeal Chocolate Chip Cookies


Have you ever wondered if there was a way to make your favorite chocolate chip cookies BETTER for you? Well, I have found a way! If you substitute some of your white flour for whole wheat and you add some oats, you can add a nice dose of whole grain fiber to your diet that you wouldn't have had from eating your standard Nestle's Toll House cookie. In fact, the fiber content jumps from 1 gram to a whopping 8 grams per serving by adding these 2 ingredients! And they are pretty delicious! 
Want my recipe?


Whole Wheat Oatmeal Chocolate Chip Cookies

Ingredients

1 cup (2 sticks) softened butter
3/4 cup packed brown sugar
3/4 cup granulated sugar
1 teaspoon vanilla 
2 eggs
1 teaspoon salt
1 teaspoon baking soda
1 3/4 cups whole wheat flour
1/2 cup all-purpose flour
1 1/2 cup oats
2 cups chocolate chips
1/2 cup unsweetened, shredded coconut (optional)
1 cup coarsely chopped nuts (I used pecans)

Directions

Cream together butter and sugars in a large mixing bowl. Add to this the eggs, vanilla, salt and baking soda until creamy. Add the remaining dry ingredients and mix until just barely combined. (Over mixing will produce tough cookies.) Scoop out mounds of cookie dough onto a greased cookie sheet and place into an oven preheated to 375 degrees. (This is a great time to use your scoopers!!) Bake for 8 minutes or until golden brown. Store in an air-tight container. (These cookies will not spread out like your typical chocolate chip cookies.) Pour yourself a nice tall glass of ice-cold milk and enjoy!

Tuesday, September 11, 2012

Sunday, September 9, 2012

Happy Birthday Ruby!!

Today is our little Ruby's 2nd birthday! We celebrated with a new chew toy and some extra special TLC. She is such a wonderful pup and the best addition to our happy little family!

Happy Birthday Ruby!! We love you!


Saturday, September 8, 2012

Arizona Grand Staycation

Our family likes to take a "staycation" once a Summer as a way of getting away without going on a long trip and paying for gas and airfare. The Arizona Grand is probably our favorite place to do this because of their great deals during the sweltering months of Summer and their water park feature. It's the perfect getaway for any family with kids.

We found a great deal on a room from Living Social and decided to use it this weekend. It was a bit of a whirlwind vacation, but it was totally relaxing, totally fun and TOTALLY worth it!!


One of our favorite things to do when we're there is to take a walk up the hill to Rustler's Rooste for dinner. If you have never been there I HIGHLY recommend it- not as much for the food as for the atmosphere. This is a cowboy-western restaurant with live country music and a dance floor set beside a big metal slide to keep the kids entertained while you wait for your food. A real-life bull named Horney is there to greet you as you walk in the door and everyone get's a big can of cotton candy with their meal before they leave. They are known for their cooked-to-order steaks and rattlesnake and there is even a little shop to buy souvenirs to remember your stay.

Here are some pictures we took at dinner.


We had a little fun with our dessert!


Oh, and another thing that makes Rustler's Roost pretty cool. . . . This was the view from our table.

Can't wait to do it all again next year!